That endless hissing from the bathroom — the question why does my toilet keep running after I flush has a refreshingly simple answer: in 90% of cases, it’s one of three cheap parts, fixable in 20 minutes with no plumber. I’ve fixed a dozen running toilets, and it’s the highest-satisfaction DIY in homeownership: a $10 part, 20 minutes, and the sweet sound of silence. Here’s the full diagnosis and fix.
First, the cost of ignoring it: a running toilet wastes 200+ gallons per day — that’s 6,000 gallons a month. At average US water rates, it’s $50-100+ monthly literally flushed away. The EPA’s WaterSense program identifies running toilets as one of the largest sources of household water waste. Fix it this weekend.
Why Does My Toilet Keep Running After I Flush? The Three Usual Suspects
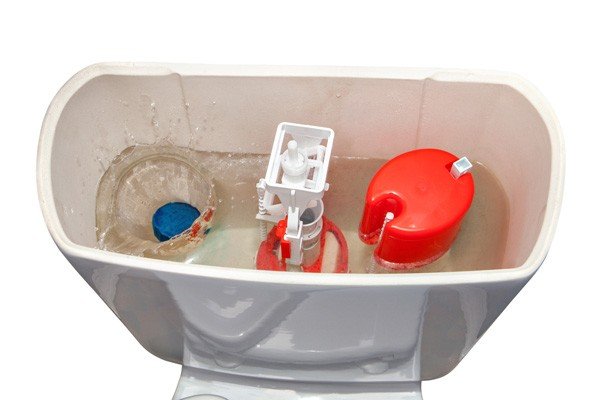
Open the tank (lift the lid — it just sits there) and look inside while it runs. You’re diagnosing which part failed:
1. The Flapper (70% of cases)
The flapper is the rubber seal at the tank’s bottom that lifts when you flush, then settles to seal the tank. When it warps, cracks, or gets mineral buildup, water leaks continuously into the bowl — and the fill valve runs forever trying to keep up.
- Test: put a few drops of food coloring in the tank. Wait 15 minutes without flushing. Color in the bowl = flapper leak. (This is the definitive test.)
- Also check: the chain — if it’s tangled or too short, it holds the flapper open. It should have ~1/2″ slack.
- Fix: turn off the water (valve behind the toilet), flush to drain, unhook the old flapper, snap on a universal replacement ($5-10). Match the size (2″ vs 3″ — measure or bring the old one). 10 minutes.
2. The Fill Valve (20% of cases)
The fill valve (the tall column, usually on the left) refills the tank after flushing and should shut off when water reaches the fill line. When its seal wears out, it never fully closes — constant hissing/trickling.
- Test: lift the float arm (or cup) manually. If the water stops, the valve needs adjustment. If it keeps running with the float fully raised, the valve seal is shot.
- Quick fix attempt: turn the adjustment screw to lower the water level to the marked fill line (usually 1″ below the overflow tube). Sometimes that’s all it needs.
- Real fix: replace the fill valve ($10-15 for a Fluidmaster 400A — the universal standard). Turn off water, unscrew the old one from below the tank, install the new one at the right height, reconnect. 20 minutes, one adjustable wrench.
3. The Overflow Tube / Water Level (10% of cases)
If the water level is set too high, water flows continuously into the overflow tube (the open pipe in the tank’s center). You’ll see water visibly draining into it.
- Fix: lower the float so water stops 1″ below the top of the overflow tube. On older ball-float arms, bend the arm gently downward. On modern cup floats, squeeze the clip and slide down.
- If the overflow tube itself is cracked (rare), it needs replacement — slightly more involved but still DIY-able.
Step-by-Step: The 20-Minute Fix
- Remove the tank lid (set it somewhere safe — porcelain lids crack easily and cost $50+ to replace).
- Do the food coloring test to confirm a flapper leak vs. fill valve issue.
- Turn off the supply valve (clockwise, behind the toilet near the floor).
- Flush to empty the tank; sponge out remaining water.
- Replace the faulty part (flapper: unhook and re-hook; fill valve: unscrew base nut, swap, reconnect supply line).
- Turn water back on, let the tank fill, check the water level (1″ below overflow tube).
- Flush twice to verify: full flush, complete refill, total silence after.
- Check for leaks at connections with dry toilet paper (shows even tiny drips).
When It’s Not the Usual Three
- Phantom flushing (toilet runs briefly every few minutes): slow flapper leak. Same fix — replace the flapper.
- Weak flush + running: the rim jets or siphon jet may be clogged with mineral deposits. Clean with a wire and vinegar, or a product designed for the purpose.
- Constant running after replacing everything: crack in the tank or bowl (look for hairline cracks), or a faulty supply valve that won’t fully open/close.
- Old toilet (pre-1994): uses 3.5-7 gallons per flush versus 1.28 for modern ones. If you’re replacing parts anyway and the toilet is 30+ years old, consider replacing the whole unit ($150-300) — the water savings pay for it in 2-3 years.
Preventing the Next One
- Don’t use drop-in tank bleach tablets. They destroy rubber flappers and seals — the #1 cause of premature flapper failure. Use in-bowl cleaners instead.
- Replace the flapper every 3-5 years proactively ($8, 10 minutes). It’s a wear item.
- If you have hard water, mineral buildup shortens valve life — consider addressing water hardness house-wide.
Running toilets are just the start of bathroom water wisdom — my leaky shower head fix and small bathroom remodel costs cover the rest of the bathroom. And that water waste shows up on your bill — see why utility bills spike for the whole-house picture.
The Dye Test Schedule
Here’s a maintenance habit that takes 30 seconds: put a few drops of food coloring in every toilet tank twice a year (when you change smoke detector batteries, for example). Check the bowl 15 minutes later. Color means a slow flapper leak — the silent water waster that runs up bills without the telltale running sound. I caught two slow leaks this way that I never would have heard. A flapper costs $8 and takes 10 minutes to replace, but only if you know it’s failing. The dye test is the cheapest diagnostic in homeownership, and most people have never done it.
The Bottom Line
Why does my toilet keep running after I flush? A worn flapper (do the food coloring test), a faulty fill valve, or a misadjusted water level — in that order of likelihood. $5-15 in parts, 20 minutes, basic hand tools. It’s wasting hundreds of gallons and tens of dollars monthly until you fix it, and the silence afterward is deeply satisfying. This is the DIY fix that turns nervous homeowners into confident ones.